5 Signs Your Insulated Tools Are Unsafe: When to Replace

When you’re working live, you rely on your tools to be the primary barrier between you and a fatal shock. If that barrier is compromised, the tool isn’t just useless. It is dangerous too.
Knowing exactly when a tool has passed its best is vital. So, what do you need to look for to ensure your kit is actually safe to handle?
When should you replace insulated tools?
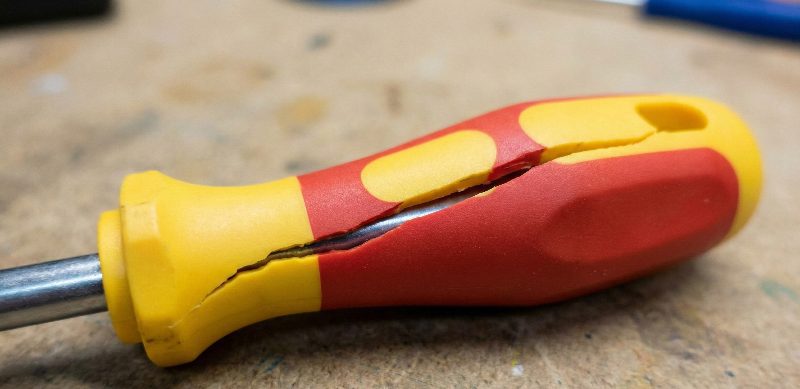
You must immediately replace insulated tools if the insulation shows any cracks, deep cuts, or separation from the metal.
Even if the protective layer is only slightly nicked, burnt, or stained by chemicals, the 1,000V AC protection may be compromised. Don’t try to be a hero and tape it up. The tool must be replaced to ensure it complies with IEC 60900 standards.
Why Visual Inspections Matter
Under the Electricity at Work Regulations 1989, everyone from the employer to the apprentice has a duty to maintain equipment to prevent danger. Your hand tools are no exception.
A visual check takes ten seconds, but it confirms whether the dielectric strength of the tool – which we test to 10,000V (more on that in a minute) – is still intact. If you spot any of the following red flags, retire the tool immediately.
1. Cracks or Deep Cuts in the Insulation
This is the most common failure point. You drop a screwdriver from a ladder or toss it into a heavy tool bag and the insulation fractures.
The Test: If you can see the metal shank through a cut, or if a crack is wide enough to catch your fingernail, the tool is a failure. At 1,000V AC, electricity seeks the path of least resistance. That crack is an open door.
Precision is key. If you’re using torque drivers, check out our guide on insulated torque tools to ensure you aren’t over-stressing them.
2. Separation of Insulation from the Tool
Poorly manufactured tools often suffer from “sleeving.” This happens when the insulation layer detaches from the steel handle or shaft. It might spin loosely in your grip or slide up and down.
We avoid this by using injection moulded thermoplastics, like Nylon 11, or sourcing from top-tier manufacturers like Boddington who understand this requirement. High-quality Nylon 11 insulation creates a permanent chemical bond with the steel. Using older PVC-dipped tools and the handle feels loose? Get rid of them.
3. Impact Damage and Chipping
Insulated tools are often used in harsh environments, but they must be able to take a knock without shattering.
Our tools are rated for Category C Impact Resistance. This means they are tested to withstand impact from -40°C +70°C. If your current spanner or plier insulation has chipped away after a drop, it likely failed to meet this standard. Missing chunks of plastic compromise the creepage distance, increasing the risk of flashover.
4. Heat or Chemical Damage
If the handle looks melted, charred, or feels sticky to the touch, the structural integrity of the plastic is gone.
This often happens when tools are stored near heat sources or left in contact with solvents that attack standard PVC. While Nylon 11 is highly resistant to moisture and oils, no material is invincible. If the texture of the handle has changed, do not trust it.
5. Worn Tips and Exposed Metal
Normal wear and tear will eventually render a tool unsafe. On a screwdriver, if the insulation at the very tip has worn away to reveal more metal than the standard allows, it’s time to upgrade.
Using a tool with worn insulation near the working head increases the risk of accidental bridging between live terminals, which causes arc flashes. Check the tip of every screwdriver in your bag.
The Science Behind the Safety: What You Are Losing
To understand why a simple crack is so dangerous, you need to understand the rigour involved in making these things.
To meet the IEC 60900 standard, our tools must undergo strict safety testing long before they reach your hands.
We both meet the standard and exceed it.
Type Testing vs Production Testing
Type Testing
In the same way that high-end car manufacturers red-line their new engines at maximum revs for hours at a time, we have to stress-test our tools far beyond everyday capability to ensure that they remain in one piece and keep you safe when you put them through their paces.
Any time we release a new tool or modify an existing model, it must pass these tests:
The Impact Test
This is to see if the tool can stand up to droppages and remains safe to use.
The standard version of this test is performed at room temperature. We pride ourselves on always doing the “extreme low temperature” version of this test.
The sample tools are cooled to -40°C where they remain for at least 2 hours. Then they are hit with a specially-designed hammer piece at a force in Newtons proportional to the tools’ weight.
For good measure we then do a 1.5m drop test onto concrete. This is where inferior tools crack and smash.
This drop test is not required by IEC, but we do it for peace of mind.
Dielectric Testing
Now things get interesting – after the sub-zero impact these same tools go straight into Dielectric Testing.
All these tests are applied sequentially!
First they are plunged into water and stay there for 24 hours.
This conditioning is to test for water absorption and expansion.
After removal and a brief dry off with a towel it’s into our testing apparatus where they are energised to 10,000 volts AC for a constant 3 minutes.
This is the gold standard of dielectric tool testing, as 10,000V gives you a 10:1 safety ratio when we certify the tool for use up to 1000V, and 3 minutes is 18 times longer than the standard production test of 10 seconds – okay we’re skipping ahead; hold that thought, we’ll return to it.
Any weakness or hairline crack will be exploited by the outward pressure of the alternating current. For this reason it’s also our standard test when developing prototypes, as it will soon tell you if there are any structural problems with the tool.
Indentation Testing
Next up it’s the Indentation Test.
This is a mix of a mechanical test and an electrical test rolled into one.
The tool is secured in a bench-setup with a small frame above and pinned with a steel prong pressed by a 2 kg weight.
This is then heated to 70°C in a ventilated chamber for 2 hours – after 5 minutes of cooling it gets electrically tested in situ for 5,000V for 3 minutes.
The idea is that the weighted prong will do damage to softer tools and the electricity will exploit any resulting weakness.
Our unique nylon bioplastic material is the ideal combination of hardness and impact-resistance, so this test is not a tough workout.
Adhesion Testing
After all this activity our tools get a chance to relax on holiday for a week somewhere warm – our industrial oven.
According to IEC 60900 they must stay there at a temperature of 70°C plus/minus 3°C for 168 hours, or 7 days in normal person speak.
We then try to pull their legs off!
Yes it’s the Adhesion Test, where we check whether the layer of insulation stays attached.
As quickly as we can before much cooling occurs we transfer the hot tools to our testing apparatus.
The tool is fixed firmly in place and a weight attached to hooks is applied to (for example) plier handles.
Screwdrivers, nut spinners, insulated knives and spanner jaws also undergo this test using specially-sized hooks and clamps.
The weight varies by tool-type but for pliers this is 51 kg.
Poor quality tools tend to fail this test as their handles are only held on with adhesive which by this point probably melted several days ago…
Ours pass with ease – our material is injection-moulded straight onto the base components and leaves no room for even the slightest slippage.
The Flame Test
Last and by no means least is the Flame Test.
Our test lab is turned into a secondary school chemistry experiment with Bunsen burners, heat mats and gauze.
The tool is clamped in place and a Bunsen burner flame is applied in the middle of the handle for 20 seconds, then observed for a further 20 seconds without the Bunsen flame.
Here, as before, we go further than the requirements. The IEC standard says that we pass if “the flame height on the hand tool does not exceed 120 mm during the 20 s of the observation period.” So the tool can be on fire with a flame of almost 5 inches for 20 seconds and be considered flame retardant!
Not good enough for us – our tools self-extinguish after the Bunsen flame is withdrawn.
Production Testing
So these are the main Type Tests that push our tools to the limit.
What about our tool that you’re holding in your hand? Surely it hasn’t undergone this barrage of tests.
You would be right – in the same way that you wouldn’t want a car engine that’s been red-lined for 5 days straight, you don’t necessarily want our abused Type Tested tool, even if it has passed with flying colours!
Instead we have what’s to our knowledge the world’s most robust Production Test.
The IEC 60900 spec says that each tool we manufacture must be given a basic version of the Dielectric Test – no 24 hour conditioning, just 10 seconds at 10,000V.
This is 18x less than the 3 minutes in the Type Test, and it’s likely permitted so that manufacturers can speed up mass production.
We believe that safety should come first over practical considerations, so we have always used 3 minutes at 10,000V as our standard production test – each and every tool!
We basically make the exceptional test our standard test. Insulated Hand Tools – where “good enough” just isn’t good enough.
How to Extend the Lifespan of Your Tools
Insulated tools are an investment. Because of the materials and the rigour we’ve just described, they cost more than standard hardware store drivers. It makes financial sense to look after them.
Preventing damage is easier than replacing your kit. Follow these protocols to ensure your tools pass inspection:
Separate Your Toolkit
Never mix insulated tools with standard heavy metal tools. If you throw a VDE screwdriver into a bag with lump hammers, cold chisels, and hacksaws, impact damage is inevitable. Use a dedicated tool roll.
Climate Control
Constant cycling between freezing vans and hot boiler rooms can cause condensation. Keep your tools dry. Moisture trapped inside a crack or between a loose sleeve and the shaft could be a hidden conductor.
Extreme temperatures can ruin your kit. For more on managing this, read our summer safety tips for electrical pros.
Proper Cleaning
Keep your tools clean, but be careful what you use. Oil and grease can make tools slippery (dangerous when working live) and can degrade lesser plastics over time. Wipe them down with a clean rag and mild soapy water. Avoid aggressive solvents like turpentine or acetone, as these can chemically attack the insulating material.
Your Safety Checklist
Before you start your next job, run through this quick list:
- Clean: Wipe off grease or dirt so you can see the surface clearly.
- Inspect: Look for cracks, cuts, or nicks.
- Test: Check if the insulation moves or spins on the shaft.
- Verify: Ensure the IEC 60900 / VDE markings are legible.
- Act: If in doubt, throw it out.
If you are working on service heads, don’t miss our safety masterclass on cut-outs.
Replacing a £20 tool is cheaper than the alternative. Don’t take the risk.
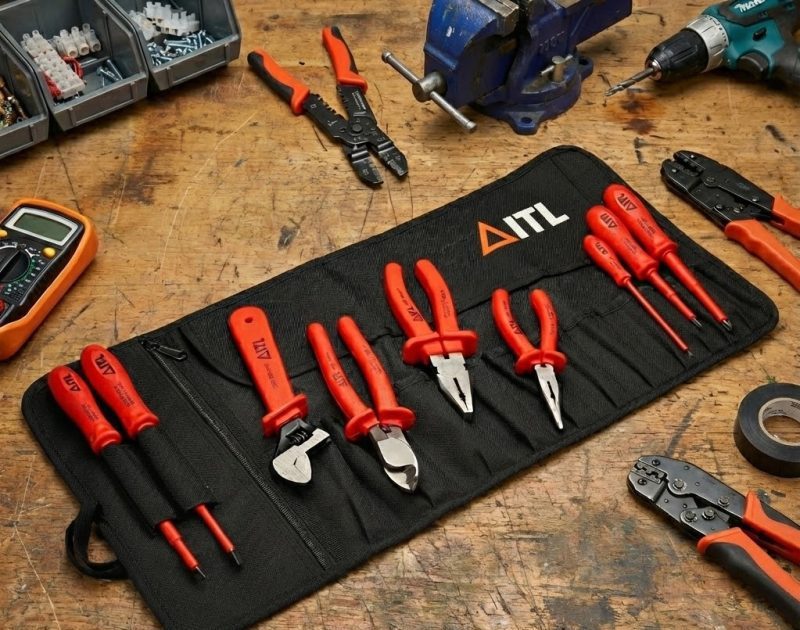
Check out our full range of insulated hand tools to ensure your kit is fully compliant and ready for the job.
Disclaimer: This blog post provides general information on electrical safety and tool standards. Always refer to specific site procedures, risk assessments, and relevant regulations (such as the UK’s Electricity at Work Regulations 1989). Seek expert advice for your particular situation. Safe work practices should always be determined by qualified personnel.